- 浏览: 677648 次
-

文章分类
最新评论
-
ymm8505:
不错…… 学习了
final -
zht19880706:
楼主,没看懂在 android 代码怎么设置
Android Audio延迟(latency) -
zjc198805:
用popwindow呈现的时候,好像不能会弹,不知道怎么回事, ...
android pinch:双指缩放图片和单指拖拽
AlarmManager2
❑ ELAPSED_REALTIME
在指定的延时过后,发送广播,但不唤醒设备。
❑ ELAPSED_REALTIME_WAKEUP
在指定的演示后,发送广播,并唤醒设备
延时是要把系统启动的时间SystemClock.elapsedRealtime()算进去的,具体用法看代码。
❑ RTC
在指定的时刻,发送广播,但不唤醒设备
❑ RTC_WAKEUP
在指定的时刻,发送广播,并唤醒设备
AlarmManager提供的方法:
❑ void set(int type, long triggerAtTime, PendingIntent operation)
设置一个闹钟
❑ void setRepeating(int type, long triggerAtTime, long interval, PendingIntent operation)
设置一个会重复的闹钟
❑ void setInexactRepeating(int type, long triggerAtTime, long interval, PendingIntent operation)
设置一个重复闹钟的不精确版本,它相对而言更节能(power-efficient)一些,因为系统可能会将几个差不多的闹钟合并为一个来执行,减少设备的唤醒次数。
内置的几个interval为:
INTERVAL_FIFTEEN_MINUTES
INTERVAL_HALF_HOUR
INTERVAL_HOUR
INTERVAL_HALF_DAY
INTERVAL_DAY
如果你将其设为DAY,那么可能这一天中的所有闹钟都会被合并掉。
❑ void cancel(PendingIntent operation)
取消一个设置的闹钟
❑ void setTimeZone(String timeZone)
设置系统的默认时区。需要android.permission.SET_TIME_ZONE权限
- // 首先创建Receiver
- public class AlarmReceiverextends BroadcastReceiver {
- @Override
- public void onReceive(Context context, Intent intent) {
- Toast.makeText(context, "alarm", Toast.LENGTH_SHORT).show();
- }
- }
- // manifest中申明,并不需要intent-filter,我们是明确指定发到哪个receiver的
- <receiver android:name="yuan.receivers.AlarmReceiver"/>
PendingIntent:简单的说就是在Intent上在加个指定的动作。Intent的话,我们还需要在执行startActivity、startService或sendBroadcast才能使Intent有用。而PendingIntent的话就是将这个动作包含在内了,如PendingIntent.getBroadcast就包含了sendBroadcast的动作。
5s后发送指定广播
- AlarmManager alarmMgr = (AlarmManager) getSystemService(Context.ALARM_SERVICE);
- Intent intent = new Intent(getApplicationContext(), AlarmReceiver.class);
- int requestCode = 0;
- PendingIntent pendIntent = PendingIntent.getBroadcast(getApplicationContext(),
- requestCode, intent, PendingIntent.FLAG_UPDATE_CURRENT);
- // 5秒后发送广播,只发送一次
- int triggerAtTime = SystemClock.elapsedRealtime() +5 * 1000;
- alarmMgr.set(AlarmManager.ELAPSED_REALTIME, triggerAtTime, pendIntent);
5s后发送指定广播,然后每个10秒重复发送广播
- AlarmManager alarmMgr = (AlarmManager) getSystemService(Context.ALARM_SERVICE);
- Intent intent = new Intent(getApplicationContext(), AlarmReceiver.class);
- int requestCode = 0;
- PendingIntent pendIntent = PendingIntent.getBroadcast(getApplicationContext(),
- requestCode, intent, PendingIntent.FLAG_UPDATE_CURRENT);
- // 5秒后发送广播,然后每个10秒重复发广播。广播都是直接发到AlarmReceiver的
- int triggerAtTime = SystemClock.elapsedRealtime() +5 * 1000;
- int interval = 10 *1000;
- alarmMgr.setRepeating(AlarmManager.ELAPSED_REALTIME_WAKEUP, triggerAtTime, interval, pendIntent);
取消一个闹钟
- AlarmManager alarmMgr = (AlarmManager) getSystemService(Context.ALARM_SERVICE);
- Intent intent = new Intent(getApplicationContext(), AlarmReceiver.class);
- PendingIntent pendIntent = PendingIntent.getBroadcast(getApplicationContext(),
- 0, intent, PendingIntent.FLAG_UPDATE_CURRENT);
- // 与上面的intent匹配(filterEquals(intent))的闹钟会被取消
- alarmMgr.cancel(pendIntent);
-------------------------------------------------------------------------------------------------------------------------------
本文通过对android内置闹铃功能的简单介绍,来让开发者朋友们了解基于OPhone平台下客户/服务模式的编程模型,以及如何使用OPhone系统提供的闹铃唤醒功能。与此同时,本文还对PendingIntent做一些简单的介绍,并通过实例程序来演示如何通过PendingIntent将闹 钟应用程序和系统闹铃服务联系起来。
一、闹铃功能
闹钟应用程序作为人 们日常常用的基本应用程序之一,其重要性不言而喻。在OPhone系统中闹铃服务功能不仅仅对闹钟应用程序服务,最重要的是可以利用该闹铃服务功能提供的 唤醒能力来做定时器。这样即便应用程序没有运行或者是没有启动的情况下,只要其注册过闹铃,那么该闹铃到时间后,OPhone系统可以自动将该应用程序启 动,这就是所谓的闹铃“唤醒“功能。
在OPhone系统中,底层系统提供了两种类型的时钟,软时钟与硬时钟,软时钟就是我们常说的Timer,硬时钟就是RTC。系统在正常运行的情况下,Timer工作提供时间服务和闹铃提醒,而在系统进入睡眠状态后,时间服务和闹铃提醒由RTC来 负责。对于上层应用来说,我们并不需要关心是timer还是RTC为我们提供服务,因为OPhone系统的Framework层把底层细节做了封装并统一提供API。这个API他的名字就叫AlarmManager。在OPhone系统中有意思的是对应AlarmManage有一个AlarmManagerServie服务程序,该服务程序 才是正真提供闹铃服务的,它主要维护应用程序注册下来的各类闹铃并适时的设置即将触发的闹铃给闹铃设备(在OPhone系统中,linux实现的设备名为”/dev/alarm”),并且一直监听闹铃设备,一旦有闹铃触发或者是闹铃事件发生,AlarmManagerServie服务程序就会遍历闹铃列表 找到相应的注册闹铃并发出广播。该服务程序在系统启动时被系统服务程序system_service启动并初始化闹铃设备(/dev/alarm)。当 然,在JAVA层的AlarmManagerService与Linux Alarm驱动程序接口之间还有一层封装,那就是JNI。
AlarmManager将应用与服务分割开来后,使得应用程序开发者不用关心具体的服务,而是直接通过AlarmManager来使用这种服务。这也 许就是客户/服务模式的好处吧。AlarmManager与AlarmManagerServie之间是通过Binder来通信的,他们之间是多对一的关系。在OPhone系统中,AlarmManage提供了3个接口5种类型的闹铃服务:
-
3个API调用接口:
<!-- <br /><br />Code highlighting produced by Actipro CodeHighlighter (freeware)<br />http://www.CodeHighlighter.com/<br /><br />-->void cancel(PendingIntent operation)
// 取消已经注册的与参数匹配的闹铃
void set(int type, long triggerAtTime, PendingIntent operation)
//注册一个新的闹铃
void setRepeating(int type, long triggerAtTime, long interval, PendingIntent operation)
//注册一个重复类型的闹铃
void setTimeZone(String timeZone)
//设置时区 -
5种闹铃类型:
<!-- <br /><br />Code highlighting produced by Actipro CodeHighlighter (freeware)<br />http://www.CodeHighlighter.com/<br /><br />-->public static final int ELAPSED_REALTIME
//当 系统进入睡眠状态时,这种类型的闹铃不会唤醒系统。直到系统下次被唤醒才传递它,该闹铃所用的时间是相对时间,是从系统启动后开始计时的,包括睡眠时间, 可以通过调用SystemClock.elapsedRealtime()获得。系统值是3 (0x00000003)。
public static final int ELAPSED_REALTIME_WAKEUP
//能唤醒系统,用法同ELAPSED_REALTIME,系统值是2 (0x00000002) 。
public static final int RTC
//当系统进入睡眠状态时,这种类型的闹铃不会唤醒系统。直到系统下次被唤醒才传递它,该闹铃所用的时间是绝对时间,所用时间是UTC时间,可以通过调用 System.currentTimeMillis()获得。系统值是1 (0x00000001) 。
public static final int RTC_WAKEUP
//能唤醒系统,用法同RTC类型,系统值为 0 (0x00000000) 。
Public static final int POWER_OFF_WAKEUP
//能唤醒系统,它是一种关机闹铃,就是说设备在关机状态下也可以唤醒系统,所以我们把它称之为关机闹铃。使用方法同RTC类型,系统值为4(0x00000004)。
开发者可以通过OPhone SDK来获取更多AlarmManager的相关细节,他所在的包是:Android.app.AlarmManager
随着OPhone系统版本的不断的升级,这些接口和闹铃类型也许会有些调整,但其基本使用方法将不会改变
二、闹钟设置与提醒
我们首先通过一个直观的UI来感受一下OPhone系统内嵌的闹钟程序是如何响应用户设置和自动提醒的的:(如下4个图所示)

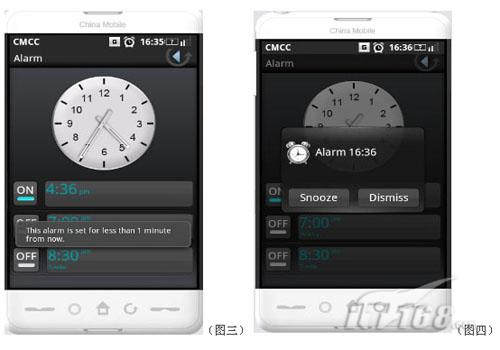
上面4图直观的告诉了开发者如何使用OPhone内嵌的闹钟应用程序,但开发者可能更关心的是通过代码如何实现这些功能。比如说怎么设置一个闹铃,该设置哪种类型的闹铃,以及如何获得闹铃时间已到并提醒用户。依据这几个问题,我们在下面的章节中逐步来介绍。
2.1 设置闹铃
在第一小节中,我们已经提到过OPhone系统AlarmManagerService提供了两个设置闹铃的API,他们分别是:
void setRepeating(int type, long triggerAtTime, long interval, PendingIntent operation)
在OPhone 1.5版本中又增加了一个API。
下面的程序演示了如何设置一个闹铃。
//时注册一个闹铃事件接收对象AlarmReceiver ,该接收对象也可以通过在//AndroidManifest.xml中发布,也可以在代码中动态注册。
import android.app.AlarmManager;
import android.app.PendingIntent;
import android.content.Intent;
import android.os.SystemClock;
import android.os.Bundle;
import java.util.Calendar;
//创建一个PendingIntent
Intent intent = new Intent(ALARM_ALERT_ACTION);
intent.putExtra(ID, id);
intent.putExtra(TIME, atTimeInMillis);
PendingIntent sender = PendingIntent.getBroadcast(
context, 0, intent, PendingIntent.FLAG_CANCEL_CURRENT);
//获得AlarmMnager并注册一个新闹铃,
//一次性闹铃的设置
AlarmManager am = (AlarmManager)getSystemService(ALARM_SERVICE);
am.set(AlarmManager.POWER_OFF_WAKEUP, atTimeInMillis, sender);
//重复性闹铃的设置
// We want the alarm to go off 30 seconds from now.
long firstTime = SystemClock.elapsedRealtime();
firstTime += 15*1000;
// Schedule the alarm!
AlarmManager am = (AlarmManager)getSystemService(ALARM_SERVICE);
am.setRepeating(AlarmManager.POWER_OFF_WAKEUP,
firstTime, 15*1000, sender);
<receiver android:name="AlarmReceiver">
<intent-filter>
<action android:name="com.android.alarmclock.ALARM_ALERT" />
</intent-filter>
</receiver>
AlarmReceiver mAlarmReceiver;
IntentFilter filter = new IntentFilter();
filter.addAction(“com.android.alarmclock.ALARM_ALERT”);
context.registerReceiver(mAlarmReceiver, filter);
public class AlarmReceiver extends BroadcastReceiver {
@Override
public void onReceive(Context context, Intent intent) {
}
}
在OPhone系统中,当应用程序所设置的闹铃时间到了后,OPhone系统中的AlarmManagerService就会从系统底层获取一个闹铃事件并从自己维护的队列中取出其匹配的闹铃,然后通过其应用注册的PendingIntent把该闹铃事件发送回给应用。
当我们的应用收到该Intent后就会启动相应的Activity来提醒用户闹铃时间到。
程序代码如下:
import android.content.Context;
import android.content.Intent;
import android.content.BroadcastReceiver;
import android.os.Handler;
import android.os.PowerManager;
import android.os.SystemClock;
public class AlarmReceiver extends BroadcastReceiver {
@Override
public void onReceive(Context context, Intent intent) {
long now = System.currentTimeMillis();
int id = intent.getIntExtra(Alarms.ID, 0);
long setFor = intent.getLongExtra(Alarms.TIME, 0);
Intent fireAlarm = new Intent(context, AlarmAlert.class);
fireAlarm.putExtra(Alarms.ID, id);
fireAlarm.setFlags(Intent.FLAG_ACTIVITY_NEW_TASK);
//启动一个新的UI对象来提醒
context.startActivity(fireAlarm);
}
}
在前面的章节中,我们在注册闹铃﹑发送闹铃事件的时候,有过一个重要的参数PendingIntent。这个PendingIntent可以说是Intent的进一步封装,他既包含了Intent的描述又是Intent行为的执行(这种定义也许不太严格),如果将Intent比作成一个订单的 话,PendingIntent更像是一个下订单的人,因为它既要负责将订单发出去,也要负责订单发送后的处理,比如发送成功后要准备验收订单货物,发送 失败后要重发还是取消订单等操作。开发者可以通过调用getActivity(Context, int, Intent, int), getBroadcast(Context, int, Intent, int), getService(Context, int, Intent, int)函数来得到一个PendingIntent实例。
通过该函数获得的PendingIntent将会扮演一个广播的功能,就像调用Context.sendBroadcast()函数一样。当系统通过它要发送一个intent时要采用广播的形式,并且在该intent中会包含相应的intent接收对象,当然这个对象我们可以在创建PendingIntent的时候指定,也可以通过ACTION和CATEGORY等描述让OPhone系统自动找到该行为处理对象。
实例代码如下:
PendingIntent sender = PendingIntent.getBroadcast(AlarmController.this,
0, intent, 0);
通过该函数获得的PendingIntent可以直接启动新的activity, 就像调用Context.startActivity(Intent)一样.不过值得注意的是要想这个新的Activity不再是当前进程存在的Activity时。我们在intent中必须使用Intent.FLAG_ACTIVITY_NEW_TASK.
实例代码如下:
PendingIntent contentIntent = PendingIntent.getActivity(this, 0,
new Intent(this, AlarmService.class), 0);
通过该函数获得的PengdingIntent可以直接启动新的Service,就像调用Context.startService()一样。
实例代码如下:
// with the alarm manager.
mAlarmSender = PendingIntent.getService(AlarmService.this,
0, new Intent(AlarmService.this, AlarmService_Service.class), 0);
四、PendingInent与 service
在OPhone系统编程中,一个完整OPhone应用程序可以有4个需要创建的模块,他们分别是:
Activity ,Broadcast intent Receiver,Service,Content Provider。Service作为一个OPhone应用程序组成部分,通常运行在系统后台,他与用户之间没有交互。像其他应用程序对象一样运行在所属 进程的主线程中。那么这就意味着它有可能进入长时间的运行等待而导致应用得不到用户的相应。所以在开发者设计程序的时候就要考虑,如果一个Service要做一些长时间的数据处理时(比如播放MP3,或者是网络下载),就需要把该工作切换到自己的线程空间来执行。
实例代码如下:
import android.app.NotificationManager;
import android.app.PendingIntent;
import android.app.Service;
import android.content.Intent;
import android.os.Binder;
import android.os.IBinder;
import android.os.Parcel;
import android.os.RemoteException;
import android.widget.Toast;
//定义一个 Service 对象
public class AlarmService_Service extends Service {
NotificationManager mNM;
public void onCreate() {
//创建一个线程来运行Runnable
Thread thr = new Thread(null, mTask, "AlarmService_Service");
thr.start();
}
public void onDestroy() {
}
Runnable mTask = new Runnable() {
public void run() {
// 通常我们就可以在这里设计长时间运行的功能,
long endTime = System.currentTimeMillis() + 15*1000;
while (System.currentTimeMillis() < endTime) {
synchronized (mBinder) {
try {
mBinder.wait(endTime - System.currentTimeMillis());
} catch (Exception e) {
}
}
}
// 停止Service
AlarmService_Service.this.stopSelf();
}
};
//在编写Service代码时,可以不实现onStart,onStop等函数,但一定要实现onBind函数
public IBinder onBind(Intent intent) {
return mBinder;
}
/* 通过该对象可以与客户端通信
*/
private final IBinder mBinder = new Binder() {
@Override
protected boolean onTransact(int code, Parcel data, Parcel reply,
int flags) throws RemoteException {
return super.onTransact(code, data, reply, flags);
}
};
}
小结:本 篇文章主要介绍了如何使用AlarmManager的定时唤醒功能,以及各种闹铃的含义与API使用实例,希望对读者朋友们在OPhone应用编程中,对AlarmManager的正确使用起到抛砖引玉的作用。同时我们还引入了一个重要的概念PendingIntent,通过对PendingIntent参数的解析,相信读者朋友们对PendingIntent的使用有了一个基本的认识。


发表评论

相关推荐
android AlarmManager 多个 定时 重复提醒,我这篇博文的源码。
Andorid AlarmManager的使用,通过这个实例可以变换实现闹钟功能
AlarmManager提供了访问系统闹钟的服务。它允许你安排你的应用在未来某个时间点运行。这就相当于定时任务。对于少于60s的定时任务,不推荐使用AlarmManager,可以使用更高效的的Handler来处理频发的任务。
http://blog.csdn.net/two_water/article/details/52004414 博客Demo
Android 后台运行 定时器 AlarmManager Service
Android AlarmManager
本示例通过AlarmManager 全局定时器 实现 定时更换壁纸
Android_AlarmManager一些简单的操作
android安卓闹铃服务AlarmManager的使用
AlarmManager 闹铃(支持重启) 设置多个闹铃 备注详细
AlarmManager简介 AlarmManager实质是一个全局的定时器,是Android中常用的一种系统级别的提示服务,在指定时间或周期性启动其它组件(包括Activity,Service,BroadcastReceiver)。本文将讲解一下如何使用...
本示例为女性贴身看护 程序 运用AlarmManager、DatePicker、TimePicker提供了以下功能: 1. 设置前一次MC的日期 2. 设置MC的周期天数 3. 设置每日提醒的时间
Android下AlarmManager的小闹钟程序,初学可以看看
1. 通过 AlarmManager 来设置定制任务 2. 用广播去启动Service 3. Service中onStartCommand()方法执行任务
app进程中,需要实现一个定时任务,只要设备处于开机状态,每隔半个小时,就需要定时向服务器上传一次位置信息,并且只要是有网络和获取到GPS信号,进程不能死,如果进程死掉了,需要自动重启。
使用AlarmManager实现Android定时任务(闹钟),解决了Android版本更新导致的定时不准确问题。Demo源码
Android中使用AlarmManager设置闹钟示例代码
先说下需求吧, 这个是服务器端设定几个时间段,比如说 周一,周三 的下午15点。 然后让用户来勾选。如果用户选择了这个时间段,那么每个周一,周三的下午15点都给用户一个提醒
在Android平台,如何使用AlarmManager启动广播BroeadReceiver 、服务Service 、页面Activity。
alarmmanager 计时器,android自己的计时器,区别于timer,,包括在api19之前的两种方式,以及api19之后的两种(都是单次的),主要运用的也就是这几种。还有api19后的重复执行的实现。(结果在应用中用文字表述了)...