大家好,今天我讲一下Android OpenGL,这个系列是我的学习笔记,希望对大家有所帮助!这一节将给大家简洁的介绍一下术语,以及第一个Android OpenGL程序.
首先让我看们看一下术语:
Vertex
(顶点)
A vertex is a point in 3D space and is the building block for many
objects. In OpenGL you can specify as few as two coordinates (X,Y) and
as many as four (X,Y,Z,W). The w-axis is optional, the default value is
set to 1.0. The z-axis is also optional, the default value is set to 0.
In this series, we will use the three main coordinates X, Y, and Z,
since the W is generally used as a placeholder. The plural of vertex is
vertices (mainly important for non native speakers, because it may
create confusion). All objects are drawn using vertices as their points,
so a point will refer to a vertex.
Triangle
(三角)
A triangle requires three points to be created. So in OpenGL, we use
three vertices to create one.
Polygon
(多边形)
A polygon is an object which has at least three connected points.
Therefor a triangle is also a polygon.
Primitives
(基本实体)
A primitive is a three-dimensional object created using either triangles
or polygons. A bit ironic: A detailed model with 50.000 vertices is
also a primitive like a low detailed model with 500 vertices.
下面就是我们的第一个Android OpenGL程序:
-
package
com.android.tutor;
-
import
android.app.Activity;
-
import
android.opengl.GLSurfaceView;
-
import
android.os.Bundle;
-
public
class
OpenGl_Lesson1
extends
Activity{
-
public
void
onCreate(BundlesavedInstanceState){
-
super
.onCreate(savedInstanceState);
-
-
GLSurfaceViewmGlSurfaceView=new
GLSurfaceView(
this
);
-
-
-
mGlSurfaceView.setRenderer(new
OpenGLRender());
-
setContentView(mGlSurfaceView);
-
-
}
-
}
我们这里的View是用的GLSurfaceView,但是它要setRenderer()一下,就像我们Activity里面的setContentView()方法一样!
这里的OpenGLRender是我重新写的类,它继承于GLSurfaceView.Renderer,我们要实现其种的三个方法:
onSurfaceCreated(),onSurfaceChanged(),onDrawFrame()。代码如下:
-
package
com.android.tutor;
-
import
javax.microedition.khronos.egl.EGLConfig;
-
import
javax.microedition.khronos.opengles.GL10;
-
import
android.opengl.GLSurfaceView.Renderer;
-
public
class
OpenGLRender
implements
Renderer{
-
@Override
-
public
void
onSurfaceCreated(GL10gl,EGLConfigconfig){
-
-
-
gl.glClearColor(0
.9f,
0
.2f,
0
.2f,
1
.0f);
-
gl.glClear(GL10.GL_COLOR_BUFFER_BIT);
-
}
-
@Override
-
public
void
onSurfaceChanged(GL10gl,
int
width,
int
height){
-
gl.glViewport(0
,
0
,width,height);
-
}
-
@Override
-
public
void
onDrawFrame(GL10gl){
-
-
}
-
-
}
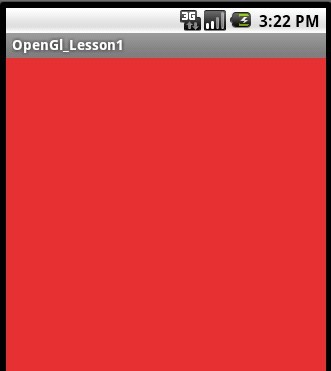
第10行就是相当于我们设置画布颜色RGBA(红绿蓝透),第11行这里是清除深度颜色缓存,不加上一句,第10句不起作用,整个View的颜色
还是黑黑的!
运行效果如下:
前面讲了一些Android OpenGl 的概念问题,这一节讲给大家讲一下如何画一个三角现出来.
一、新建一个Android工程命名为:OpenGL_Lesson2.
二、修改OpenGL_Lesson2.java代码如下:
-
package
com.android.tutor;
-
import
android.app.Activity;
-
import
android.os.Bundle;
-
public
class
OpenGL_Lesson2
extends
Activity{
-
-
private
OpenGlViewmOpenGlView;
-
public
void
onCreate(BundlesavedInstanceState){
-
super
.onCreate(savedInstanceState);
-
-
mOpenGlView=new
OpenGlView(
this
);
-
setContentView(mOpenGlView);
-
-
}
-
}
三、新建一个类OpenGlView.java继承与GLSurfaceView,代码如下:
-
package
com.android.tutor;
-
import
android.content.Context;
-
import
android.opengl.GLSurfaceView;
-
public
class
OpenGlView
extends
GLSurfaceView{
-
-
private
OpenGlRendermOpenGlRender;
-
public
OpenGlView(Contextcontext){
-
super
(context);
-
mOpenGlRender=new
OpenGlRender();
-
setRenderer(mOpenGlRender);
-
}
-
-
-
-
}
四、新建一个OpenGlRender.java类继承与Renderer,代码如下:
-
package
com.android.tutor;
-
import
java.nio.ByteBuffer;
-
import
java.nio.ByteOrder;
-
import
java.nio.FloatBuffer;
-
import
java.nio.ShortBuffer;
-
import
javax.microedition.khronos.egl.EGLConfig;
-
import
javax.microedition.khronos.opengles.GL10;
-
import
android.opengl.GLSurfaceView.Renderer;
-
public
class
OpenGlRender
implements
Renderer{
-
-
private
float
_red=0f;
-
private
float
_green=25f;
-
private
float
_blue=200f;
-
-
private
ShortBuffer_indexBuffer;
-
-
private
FloatBuffer_vertexBuffer;
-
-
-
private
short
[]_indicesArray={
0
,
1
,
2
};
-
private
int
_nrOfVertices=
3
;
-
@Override
-
public
void
onSurfaceCreated(GL10gl,EGLConfigconfig){
-
-
gl.glEnableClientState(GL10.GL_VERTEX_ARRAY);
-
initTriangle();
-
}
-
@Override
-
public
void
onSurfaceChanged(GL10gl,
int
width,
int
height){
-
-
gl.glViewport(0
,
0
,width,height);
-
}
-
-
-
@Override
-
public
void
onDrawFrame(GL10gl){
-
gl.glClearColor(_red,_green,_blue,1
.0f);
-
-
gl.glClear(GL10.GL_COLOR_BUFFER_BIT);
-
-
gl.glColor4f(0
.5f,0f,0f,
0
.5f);
-
gl.glVertexPointer(_nrOfVertices,GL10.GL_FLOAT,0
,_vertexBuffer);
-
gl.glDrawElements(GL10.GL_TRIANGLES,_nrOfVertices,GL10.GL_UNSIGNED_SHORT,_indexBuffer);
-
}
-
-
private
void
initTriangle(){
-
-
ByteBuffervbb=ByteBuffer.allocateDirect(_nrOfVertices*3
*
4
);
-
vbb.order(ByteOrder.nativeOrder());
-
_vertexBuffer=vbb.asFloatBuffer();
-
-
-
ByteBufferibb=ByteBuffer.allocateDirect(_nrOfVertices*2
);
-
ibb.order(ByteOrder.nativeOrder());
-
_indexBuffer=ibb.asShortBuffer();
-
-
float
[]coords={
-
-0
.5f,-
0
.5f,0f,
-
0
.5f,-
0
.5f,0f,
-
0f,0
.5f,0f
-
};
-
-
_vertexBuffer.put(coords);
-
-
_indexBuffer.put(_indicesArray);
-
-
_vertexBuffer.position(0
);
-
_indexBuffer.position(0
);
-
}
-
}
五、运行之,效果如下:

今天晚上就先不做详细解释了!改日在加上!谢谢~
分享到:


相关推荐
NULL 博文链接:https://sudongfeng.iteye.com/blog/905382
package ljh.opengl;是对OpenglES的一些封装。 package ljh.game;是对一些游戏常用的代码的封装 都没写完! 最近改学IOS了 看看什么时候能补充完。
Android 3D游戏开发技术宝典 OpenGL ES2.0学习。
Android OpenGL ES学习笔记之绘制一个立方体-附件资源
为了满足广大Android开发爱好者与从业者的学习需求,我们精心整理并上传了一份全面而实用的Android项目资源包。这份资源包内容丰富,涵盖了从基础知识到实战应用的全方位内容,旨在为开发者们提供一个便捷、高效的...
BlogApp博客专栏《OpenGL.ES在Android上的简单实践》对应项目专栏地址:
FirstOpenGlDemo。本文主要通过学习《OpenGL ES应用开发实践指南(Android卷)》一书所做笔记,加上自己的理解编写,涉及的代码均出自原书。
为了满足广大Android开发爱好者与从业者的学习需求,我们精心整理并上传了一份全面而实用的Android项目资源包。这份资源包内容丰富,涵盖了从基础知识到实战应用的全方位内容,旨在为开发者们提供一个便捷、高效的...
android学习笔记 android的开源project python related 12306 Python programs to practice or demonstrate skills. js related html5动画那本书 js实现的数据结构与算法 js编程风格,也有语法 js语法学习 js开源教程...
You only need to create your game once and deploy it on all major platforms like iOS, Android, and WinRT without changing a single source file. The book begins with a brief introduction to creating ...
Android代码基于深度学习,我们设计了高效的网络模型,该模型鲁棒性更好,支持多人脸跟踪。当前深度学习算法在人脸标定方向获得了很好的效果,该项目推进提供了一种大规模简单易用的实现方式。 相关资源 (2019.02....
准备好除了拥有PC /笔记本电脑(带有网络摄像头)或Android Mobile(带有摄像头)之外,您还必须熟悉C ++及其一些库: 一个开源计算机视觉库。 在C ++和python中可用开源行业赞誉的设计库。 提供C,C ++和Java版本 -...